

Do Trail Cameras Work Through Glass or Behind? Expert Advice and Practical Solutions
Trail cameras, also known as game cameras, are primarily designed for outdoor use. These cameras capture images and videos of wildlife or monitor properties when triggered by motion. A common question arises: Do trail cameras work through window glass?
Understanding how camera technology interacts with glass surfaces is important for anyone thinking about using trail cameras for security purposes. Here are some key things to consider:
- Infrared Reflection: Many trail cameras use infrared technology to see at night, which can bounce off glass.
- Motion Detection Limitations: Passive Infrared (PIR) sensors may have difficulty detecting movement through glass barriers.
If you want to monitor your home securely, it’s essential to understand how these factors affect the performance of trail cameras near windows. This knowledge can help you make better decisions about whether or not to use them in such situations.
Understanding Trail Camera Technology
Trail cameras, also known as game cameras, use advanced technology to take pictures and videos of wildlife and other activities. Here are the main features that make them work:
1. Infrared Technology
This feature allows the camera to see in the dark. Infrared (IR) sensors send out light that humans can’t see but can brighten up an area for the camera. When it gets dark, the camera switches to IR mode and can take clear pictures even when there’s little light.
2. Passive Infrared (PIR) Sensors
These sensors are essential for detecting motion. They work by sensing changes in heat from moving objects like animals or people. When something warm moves within the sensor’s range, it triggers the camera to snap photos or start recording video. This technology works particularly well outdoors where there are no obstacles.
The Impact of Environmental Factors on Trail Camera Performance

Environmental factors significantly influence trail camera performance. Here are two key aspects to consider:
Glare from Glass Surfaces
When trail cameras are positioned behind glass, infrared light can bounce off the surface, causing glare and washed-out images. This problem is more pronounced at night when IR illuminators turn on.
Challenges with Placement
Understanding these technologies is crucial for anyone thinking about using trail cameras for security purposes. Being aware of limitations caused by environmental factors like glass can help you make better choices about where to put your cameras and how to use them.
Proper alignment and positioning can reduce some issues, but certain difficulties will always be present when using trail cameras through glass barriers.
Limitations of Using Trail Cameras Behind Glass
Using trail cameras behind glass surfaces presents significant challenges that can hinder their functionality. Key limitations include:
1. Detecting Motion Through Glass Barriers
Trail cameras rely on Passive Infrared (PIR) sensors to detect movement based on heat signatures. Since these sensors cannot effectively perceive heat through glass, the camera may fail to trigger even if there is activity outside. For example, a deer passing by a window may remain undetected simply due to the barrier.
2. Night Vision Capabilities with Glare Interference
Many trail cameras utilize infrared (IR) technology for night vision. When positioned behind glass, the IR light can reflect off the surface, resulting in glare that washes out images. This effect is particularly pronounced at night when the camera’s IR illuminators are activated.
A real-life instance involved a homeowner attempting to monitor their yard through a window; the resulting footage was unusable due to significant glare obscuring the view.
The interplay of these factors means that while some users might expect their trail cameras to function effectively behind glass, they often encounter disappointing results. Understanding these limitations is crucial for anyone considering trail cameras for security purposes or wildlife observation from indoors.
Best Practices for Using Cameras Near Windows or Glass Surfaces
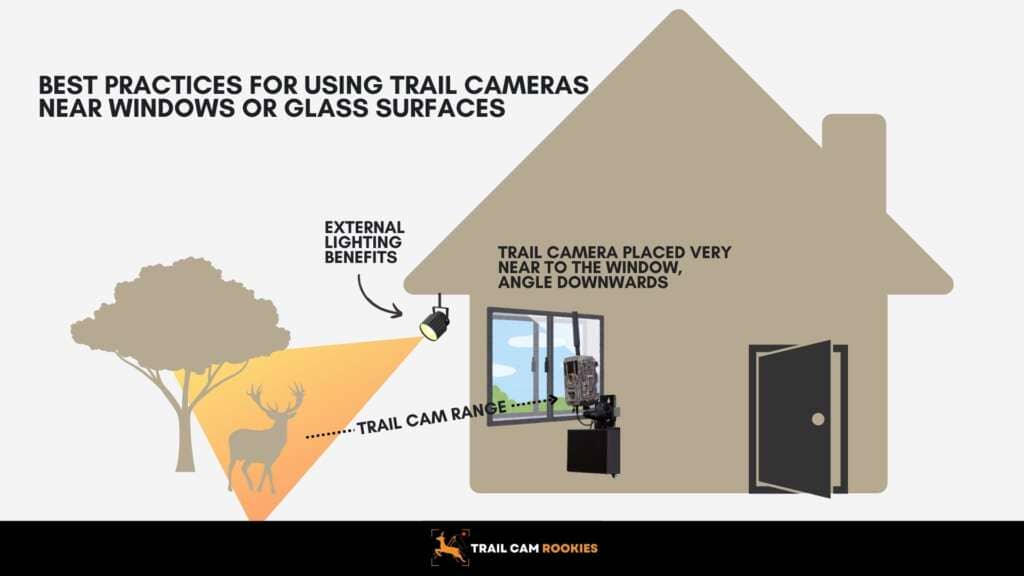
Positioning trail cameras and security cameras near windows or glass surfaces requires special consideration to optimize their effectiveness. Here are practical tips to enhance performance:
1. Angle Adjustment Techniques
- Adjust the camera angle to minimize reflection issues. Even slight changes can significantly impact how light interacts with the glass.
- Aim for an angle that directs the camera away from direct sunlight, reducing glare.
2. External Lighting Benefits
- Utilizing external lighting sources can dramatically improve image quality during low-light conditions.
- Consider using motion-activated lights outside the window to illuminate the area without triggering IR lights on your camera, thus avoiding reflections.
3. Distance from Glass
Position the camera as close to the glass as possible without obstructing its view. This placement helps reduce glare and allows better focus on subjects outside.
4. Experimentation
Test various positions and angles to find the optimal setup. Take sample images at different times of day and under varying light conditions to assess performance.
5. Disabling IR Lights
If using a trail camera, consider disabling IR illuminators when placed behind glass at night. This action prevents unwanted reflections that can wash out images.
Implementing these strategies enhances your camera’s ability to capture clear footage while managing challenges posed by glass surfaces. Each adjustment contributes to more reliable monitoring capabilities in your home security setup.
Exploring Alternatives: Indoor-Outdoor Versatility in Camera Models
When looking for alternatives to traditional trail cameras, specialized camera models designed for indoor-outdoor use can be an effective solution. These cameras are built with features that address common challenges, such as glare and reflections from glass surfaces.
Key Features of Indoor-Outdoor Cameras
These versatile models offer several key features:
- Anti-Reflection Technology: Many of these cameras incorporate materials or coatings that reduce glare, enhancing image clarity even when positioned near windows.
- Adaptive Lighting: Some models adjust their lighting settings automatically based on environmental conditions, ensuring optimal performance both during the day and night.
- Flexible Mounting Options: Designers often include various mounting accessories, allowing you to place the camera at angles that minimize reflection issues.
These specialized options provide greater adaptability for home security setups, making them suitable for monitoring both interior and exterior areas effectively.
FAQ
Q1: Can a standard trail cam effectively detect motion through a glass window?
A: No, standard trail cams use Passive Infrared (PIR) sensors that struggle to detect heat signatures through glass, hindering motion detection.
Q2: Why does glare affect security cameras working through window glass, particularly at night?
A: Infrared (IR) light from the camera’s night vision reflects off the glass, causing glare that washes out the recorded images.
Q3: Are there any specific security camera systems designed to minimize reflection when placed behind glass?
A: Yes, some indoor cameras feature anti-reflection technology and adaptive lighting to improve performance through windows, unlike basic trail cams.
Q4: How does the “amount of light” impact a security camera’s performance when looking through a glass window at night?
A: Low ambient light conditions can exacerbate glare from the camera’s IR, making it difficult to obtain clear footage through a window.
Q5: Can a 4K security camera record motion clearly through a pane of glass, or will the glass reduce the pixel quality?
A: While a 4K camera offers high resolution, glass can still cause reflections and blurriness, impacting the clarity of recorded motion.
Q6: Does using a suction cup mount to position a security camera close to the glass improve its performance?
A: Yes, positioning the camera as close as possible minimizes the distance for IR reflection, improving clarity and reducing glare.
Q7: If I disable the infrared lights on my trail cam, will it improve the recordings through glass?
A: Yes, disabling IR can prevent reflections, but you’ll need sufficient external lighting for night recordings.
Q8: How does dual-band Wi-Fi support ensure stable connectivity for a security camera placed in a window?
A: Dual-band Wi-Fi reduces interference, ensuring a reliable wireless connection, which is crucial for real-time monitoring through a window.
Q9: Are color night vision security cameras better at recording through glass than traditional infrared cameras?
A: Color night vision relies on ambient light, reducing the need for IR, thus minimizing reflection issues compared to standard IR cameras.
Q10: Would a camera with an impressive f1.0 aperture, like the CX series, improve performance through a window at night?
A: While a wider aperture gathers more light, it won’t eliminate reflections caused by the glass itself, although it will improve the image in low light.

Rohan, the founder and driving force behind Trail Cam Rookies, first discovered his passion for trail cameras during an expedition in Central Europe. Fascinated by how these devices bridge the gap between humans and wildlife, he has since dedicated himself to exploring and sharing the intricacies of trail camera technology. Through Trail Cam Rookies, he offers beginner-friendly guides, comprehensive product reviews, and practical tips to help enthusiasts connect more deeply with the natural world.