

Trail Cam That Take Pictures, But Only Few. How to Fix It and Avoid Trail Camera Frustrations
As an avid wildlife enthusiast, I’ve often grappled with the puzzling question: Why does my trail camera only takes a few pictures? This is a common challenge faced by many, and I’ve spent considerable time delving into it to understand the myriad issues that can plague these devices. Here’s what I’ve discovered:
- SD Card Snafus: Did you know that using the wrong type of SD card is a frequent issue? In fact, some cameras are finicky and only work with specific types. Also, a full or locked SD card can abruptly stop your camera from taking more pictures.
- Battery Blues: The lifeblood of your trail camera, batteries, can be tricky. I learned that if they’re dead or mismatched in power, your camera might not work at all. It’s not just about popping in any battery; using the correct type matters immensely.
- Settings and Placement: Here’s an interesting fact: placement issues account for a significant number of camera failures. If your camera is too high or far from the trail, it might miss all the action. Additionally, incorrect settings can render your camera inactive.
- Environmental Factors: Seasonal changes and food source shifts can dramatically affect your camera’s performance. Deer, for instance, change their patterns based on food availability and season. This information was a game-changer for me.
Troubleshooting isn’t just a task; it’s an art. It’s about knowing your device inside and out, and understanding how even small changes can have big impacts. In wildlife monitoring, where every picture can tell a story or reveal a pattern, ensuring your trail camera is functioning optimally is non-negotiable.
In the next sections, we’ll dive into each of these issues in detail, offering specific solutions and tips to get your trail camera back on track. Let’s turn those few pictures into albums of wilderness wonders!
Understanding Your Trail Camera
The Basics of Trail Camera Operation
Let’s get to the heart of it: how do trail cameras work? These gadgets are not just cameras; they’re your eyes in the wilderness, working round the clock. Here’s a snapshot of their operation:
- Motion Sensors: The lifeblood of a trail camera. They detect movement, triggering the camera to take a photo or record a video. Did you know? Some models can detect motion up to 100 feet away!
- Infrared Technology: For night-time photography, trail cameras use infrared. This allows for clear images, even in total darkness.
- Storage: SD cards store your captured images and videos. Remember, capacity matters – a higher capacity means more memories captured.
- Power Source: Most run on batteries, but did you know some can also be powered by solar panels?
Now, if you’re curious about more tech-savvy models, like those connecting via WiFi or cellular networks, peek at our articles “How Does a WiFi Trail Camera Work?” and “How Cellular Trail Cameras Work”. These pieces will give you a deeper dive into the world of advanced trail cameras.
Importance of Reading the Manual
You might think, “It’s just a manual, how important can it be?” Well, incredibly so! Each trail camera is a unique beast, and the manual is your guide to taming it. Here’s why it’s a must-read:
- Model-Specific Features: Every camera has its quirks. The manual details these, helping you utilize your device to its fullest potential.
- Troubleshooting Tips: Stuck with a problem? The manual often has the solution.
- Maintenance Advice: To prolong your camera’s life, follow the maintenance tips in the manual.
Remember, knowledge is power, especially in the world of trail cameras. By understanding the basics and respecting the manual, you’re setting yourself up for success in capturing those elusive wildlife moments.
Is there an Issue with the SD Card in My Trail Camera?
Understanding the role of SD cards in your trail camera’s performance is crucial. Let’s navigate through the common SD card issues and solutions.
How to Check if Your SD card is Working
A functioning SD card is pivotal for a trail camera to store pictures. It’s vital to confirm that your camera is taking pictures and that your SD card is not to blame. You can do this by testing it in other devices or using a computer to evaluate its data storage capabilities.
Choosing the Right SD Card

Picking the right SD card is as important as selecting the right location for your camera. Here’s what you need to know:
- Capacity Matters: Most trail cameras support up to 32GB SD cards. Using a larger capacity, like 256GB, might render the card incompatible. Larger capacity means more photos and videos, but ensure your camera can handle the capacity you choose.
- Type of Card: There are SDHC and SDXC cards. Some cameras only work with SDHC cards, so always check your camera’s specs.
- Speed Class: Speed Class refers to the speed at which an SD card can save data. A higher Speed Class means faster saving of photos and videos, crucial for high-quality video recording. For high-resolution video recording, such as 4K or high frame rate videos, you’ll want a higher speed class. The classes are generally categorized as Class 10, UHS-I, UHS-II, and UHS-III, with UHS-III being the fastest. To check the speed class of an SD card, you can look for symbols on the card itself: a number inside a ‘C’ (like 10 inside a ‘C’ for Class 10), or a number inside a ‘U’ (like 1 or 3 for UHS-I or UHS-III).

Common SD Card Problems
Even the right SD card can encounter issues. Let’s look at the most common ones:
- Full SD Card: A full card can’t store new photos or videos. Regular checks and data backup are essential.
- Needs Formatting: New SD cards often require formatting, either via a computer or in the camera itself. This prepares the card for use.
- Locked SD Cards: A tiny switch on the side of the SD card can lock it, preventing new data from being saved. Always check this before use.
Signs of a Damaged SD Card
A damaged SD card can be a silent issue. Here’s how to identify and resolve it:
- Signs of Damage: Glitches in photos or videos, irregular saving behavior, or the camera not recognizing the card indicate damage. If photos or videos won’t open, it might be the card, not the camera.
- Erratic Behavior: Sometimes it saves, sometimes it doesn’t. This inconsistency screams card trouble.
- No Recognition: If the camera doesn’t recognize the card, it might be damaged.
- Resolution Steps:
- Test the card in another device to confirm it’s the card at fault.
- Try reformatting the card; however, this will delete existing data.
- If issues persist, replacing the card is the most reliable solution.
For more specific issues, like with Browning trail cameras, our post “Troubleshooting 4 Common Browning Trail Camera Card Errors” is a goldmine.
Battery Management

In the realm of trail cameras, battery management is key. Let’s dive into selecting the right batteries and tackling common battery issues, ensuring your trail camera is always ready to capture that perfect shot.
Selecting the Right Batteries
Choosing the right batteries for your trail camera can make a huge difference. Here’s a quick guide:
- Alkaline vs. Lithium: Alkaline batteries are cost-effective and easily available. Lithium batteries, however, offer longer life and better performance in extreme temperatures.
- Consistency in Performance: Lithium batteries provide consistent power output, crucial for optimal camera function.
- Cold Weather Usage: If you’re setting up in colder environments, lithium batteries are your go-to choice for reliable performance.
For an in-depth look at the best batteries for different scenarios, don’t miss our guide, “Best AA Batteries for Trail Cameras”
Common Battery Issues
Even the best batteries can face issues. Keep an eye out for these:
- Dead Batteries: Regularly check and replace batteries to avoid missing out on crucial captures.
- Corrosion: Being outdoors in harsh conditions can cause battery corrosion. This appears as a white, powdery substance in the battery compartment, especially near the contact points. Corrosion interferes with power transmission. Regular checks can prevent long-term damage.
- Solution: Gently scrape off the corrosion and insert new batteries. This often resolves the issue.
- Rechargeable Battery Challenges: While eco-friendly, rechargeable batteries may not always provide the consistent power needed for optimal camera performance.

Optimal Camera Settings and Placement
Getting the settings and placement of your trail camera just right is like finding the perfect spot for a hidden treasure. Let’s break down how to configure your camera settings and strategically place it for the best wildlife captures.
Configuring Camera Settings
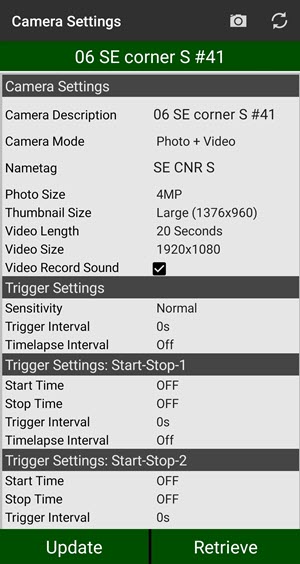
The right settings can be the difference between a gallery of wildlife photos and a memory card full of blanks. Let’s dive in:
- Motion Detection Settings:
- The sensitivity of your motion sensor is key. Too sensitive and you get false triggers, too low and you might miss out.
- If you’re struggling with too many false alarms, our article “Trail Camera Too Sensitive? 7 Tips to Tame Those False Triggers!” has got you covered.
- Time-Lapse Mode:
- Perfect for capturing a sequence of images at set intervals. It’s ideal for monitoring over extended periods.
- Great for observing patterns in wildlife activity, especially in areas where motion detection isn’t as effective.
Strategic Camera Placement
Placing your camera in the right spot is crucial for capturing those once-in-a-lifetime shots. Here are some tips:
- Trail and Water Sources Proximity:
- Position your camera near trails and water sources. These are wildlife hotspots.
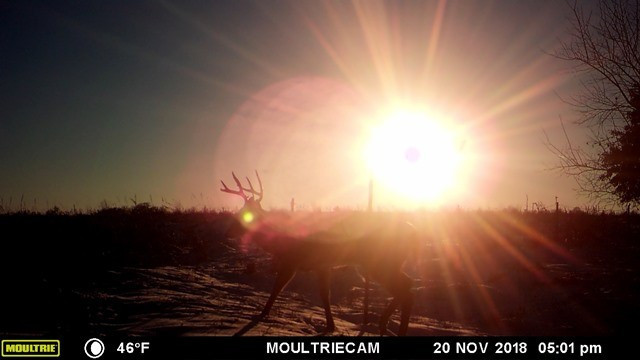
- Ensure the camera is not directly facing the sun to avoid glare.
- Height and Angle Matters:
- Mounting the camera at about 3-4 feet off the ground, angled slightly downward, offers a good view without missing smaller creatures.
- Consider Environmental Factors:
- Keep in mind the season and how it affects animal behavior. This can dictate where you should place your camera.
- Be aware of the surroundings – branches and leaves can obstruct your camera’s view.
For a deeper understanding of how to fine-tune your camera’s detection settings, don’t forget to check out “PIR Delay Vs Detection Delay on Trail Camera – Setting it Right.”
Environmental and External Factors
The world outside doesn’t pause, and neither does the wildlife. Understanding how environmental and human factors affect your trail camera’s effectiveness is key to capturing those awe-inspiring wildlife moments.

Impact of Seasons and Food Sources
The ebb and flow of wildlife movement are largely dictated by the seasons and available food sources. Let’s explore:
- Seasonal Shifts:
- Animals change their patterns with the seasons. For example, during mating season, they might frequent different areas.
- Adjust your camera placement as seasons change to stay in tune with these movements.
- Food Source Dynamics:
- Wildlife gravitates towards areas with abundant food. This could be natural vegetation or water sources.
- In different seasons, these sources can shift, so keeping an eye on this can lead to better captures.
Human Pressure and Camera Checking Frequency
Your presence in the wild, believe it or not, plays a big role in what your camera captures. Here’s what to consider:
- Minimizing Human Presence:
- Frequent visits to check your camera can spook wildlife. The less human scent and disturbance, the better.
- Pondering how often to check your trail camera? “Avoid Mistakes: How Often Should You Check Trail Cameras?” offers great insights.
- Camera Checking Strategy:
- Limiting your visits during sensitive times, like breeding or feeding periods, can reduce human impact.
- When you do check your camera, be quick and quiet. The less disturbance, the better.
Enhancing Camera Performance
Maximizing your trail camera’s performance isn’t just about technical settings; sometimes, it’s about being a bit more strategic in the wild. Let’s dive into using deer attractants and the benefits of adding more cameras to your setup.
Using Deer Attractants
Attractants can be a game-changer in wildlife photography, especially when targeting elusive deer. Here’s the lowdown:
- Types of Attractants:
- Food baits like corn or specialized deer feed can draw deer to your camera’s vicinity.
- Scent attractants work well too, especially during the rutting season.
- Effectiveness:
- Attractants can significantly increase your chances of capturing deer on camera.
- They are most effective when placed strategically near your camera, considering wind direction and deer paths.
Increasing Camera Assets
Sometimes, one camera just isn’t enough. Knowing when to add more to your arsenal is crucial:
- Coverage Area:
- The larger the area you want to monitor, the more cameras you’ll need.
- Think of it as casting a wider net to capture more wildlife activity.
- Targeting Specific Wildlife:
- For monitoring specific species or tracking an elusive animal, additional cameras can provide different angles and more frequent captures.
- Benefits:
- Multiple cameras can offer a comprehensive view of wildlife movements and behaviors.
- They can cover different trails, feeding areas, and water sources, ensuring you don’t miss any action.
Advanced Troubleshooting
Sometimes, even the most seasoned trail camera users hit a snag. When technical glitches arise, it’s crucial to know how to tackle them and when to call in the experts. Let’s explore some advanced troubleshooting tips.
Dealing with Technical Glitches
Encountering technical issues can be frustrating, but often they can be resolved with some savvy troubleshooting. Here’s what to do:
- Detection Problems:
- Check if the sensor settings are too low or high and adjust them accordingly.
- Ensure nothing is obstructing the camera’s sensor, like branches or leaves.
- Lens Glare and Lighting Issues:
- Reposition your camera away from direct sunlight to avoid lens flare.
- Adjust the camera angle to prevent overexposure or underexposure due to lighting conditions.
When to Seek Professional Help
Knowing when to seek professional help can save you time and protect your investment. Here are signs it’s time to call in the pros:
- Persistent Technical Issues:
- If you’ve tried all troubleshooting steps and problems persist, professional assessment may be necessary.
- Physical Damage:
- Visible damage, like cracks or water damage, usually requires a professional’s touch.
- Warranty Considerations:
- Check if your camera is still under warranty. If so, professional repair might be covered.
Wrapping Up
As we wrap up our journey through the intricate world of trail camera troubleshooting and optimization, we’ve covered a spectrum of topics from SD card management to the impact of environmental factors on your camera’s ability to capture those breathtaking wildlife moments. Whether it’s addressing the common frustration of a trail camera not taking pictures, managing settings for getting deer or whitetails, or understanding the nuances of trail cam detection, we’ve touched upon it all.
But remember, the art of trail camera photography doesn’t stop here. For more insights on positioning your camera to capture the best shots, especially when dealing with tricky lighting or ensuring the perfect angle for those majestic whitetails, check out our blog on “How to Position Your Trail Camera for the Best Shots”. This guide is packed with practical tips and expert advice to help you make the most out of your outdoor gear.
Before you head out to set your camera, ponder this real-life scenario: You’ve placed your trail camera near a busy trail in the woods, but it’s only capturing a few pictures, most of which are triggered by blowing leaves. What adjustments would you make first? Would you reposition the camera, adjust the sensitivity, or check for SD card issues?
Your experiences in the field are as valuable as the knowledge we share. So, as you embark on your next wildlife photography adventure, armed with these tips and tricks, we encourage you to experiment, adapt, and share your stories with us. Happy trails and happy captures!
FAQ Section
Q1: Why is my trail camera not taking pictures?
A1: This could be due to several reasons like dead batteries, SD card issues (full, locked, or needs formatting), incorrect camera settings, or placement issues such as being too high or at the wrong angle.
Q2: How can I fix a trail camera that takes pictures of nothing?
A2: First, check your camera’s motion sensitivity settings and adjust them. Ensure there’s no obstruction in front of the camera. Sometimes, moving objects like branches can cause false triggers.
Q3: What type of SD card should I use in my trail camera?
A3: Use an SD card compatible with your camera model, usually up to 32 GB. Check if your camera requires an SDHC or SDXC card and ensure it’s not locked or full.
Q4: Can the placement of my trail camera affect its ability to take pictures?
A4: Yes, camera placement is crucial. Place your camera facing north to avoid direct sunlight, at a height of about 3 feet, and angle it slightly downward for optimal coverage.
Q5: What should I do if my Moultrie trail camera is not taking pictures?
A5: Double-check the camera settings to ensure it’s on and set to take pictures. Also, inspect the batteries and SD card for any issues.
Q6: How many pictures should a trail camera take?
A6: The number of pictures a trail camera takes depends on its settings, the frequency of wildlife movement, and environmental factors. Adjust the settings based on your monitoring needs.
Q7: What are common trail camera frustrations and how to resolve them?
A7: Common frustrations include cameras not taking pictures, false triggers, battery life issues, and SD card problems. Resolving these typically involves checking and adjusting settings, replacing batteries, and managing SD cards properly.
Q8: How do I ensure my trail camera is effectively taking photos?
A8: Regularly check and maintain your camera. Ensure it has fresh batteries, a properly formatted SD card, and is placed in an area with frequent wildlife activity.
Q9: What should I do if my trail camera is taking too many pictures?
A9: If your camera is taking too many pictures, lower the motion sensitivity and check for moving objects like blowing leaves in the camera’s field of view which can cause false triggers.
Q10: When should I consider using more than one trail camera?
A10: Consider using multiple cameras if you need to monitor a large area or different trails, or if you’re targeting specific wildlife like mature bucks or whitetails. Multiple cameras can provide different angles and more frequent captures.

Rohan, the founder and driving force behind Trail Cam Rookies, first discovered his passion for trail cameras during an expedition in Central Europe. Fascinated by how these devices bridge the gap between humans and wildlife, he has since dedicated himself to exploring and sharing the intricacies of trail camera technology. Through Trail Cam Rookies, he offers beginner-friendly guides, comprehensive product reviews, and practical tips to help enthusiasts connect more deeply with the natural world.